
Crochet Cat Earflap Hat for All Ages: Easy and Cute Design
There’s something undeniably charming about a crochet cat earflap hat. It’s cozy, practical, and playful all at once.
Whether you’re making it for a child, a cat-loving adult, or simply as a fun addition to your winter wardrobe, this project blends warmth with a dash of personality.
The design is approachable for beginners but still satisfying for experienced crocheters who enjoy adding creative flair to their work. In this tutorial, we’ll explore how to make one from start to finish, along with helpful tips, styling ideas, and ways to customize it.
Why a Cat Earflap Hat?
Earflap hats are a staple in cold-weather accessories. The extended flaps protect your ears and cheeks from chilly winds, while the snug fit keeps your head warm.
Refill Your Creative Cup
Feeling stuck or out of ideas? Let us bring the spark back to your hook. Our weekly emails deliver patterns, tips, and inspiration to keep your creativity blooming.
😍 Bring Your Crochet Mojo Back – Sign Up Now! Click on the image 👆🏼
Add to that the adorable pointed cat ears, and you have a hat that’s not just functional but also a conversation starter. It’s a perfect project if you want something practical yet whimsical, making it an excellent gift or market stall item.
Materials and Tools
Before you start, you’ll need:
- Worsted weight yarn in your chosen colors (acrylic or wool blends work well for warmth and structure)
- Crochet hook (commonly 5 mm / H-8, but check your yarn label for the best match)
- Scissors for trimming yarn
- Yarn needle for weaving in ends
- Optional: stitch markers to help with symmetry
Choosing a yarn with some firmness will help the cat ears stand upright without extra support. If you prefer a softer, slouchier look, opt for a lightweight acrylic or cotton blend.
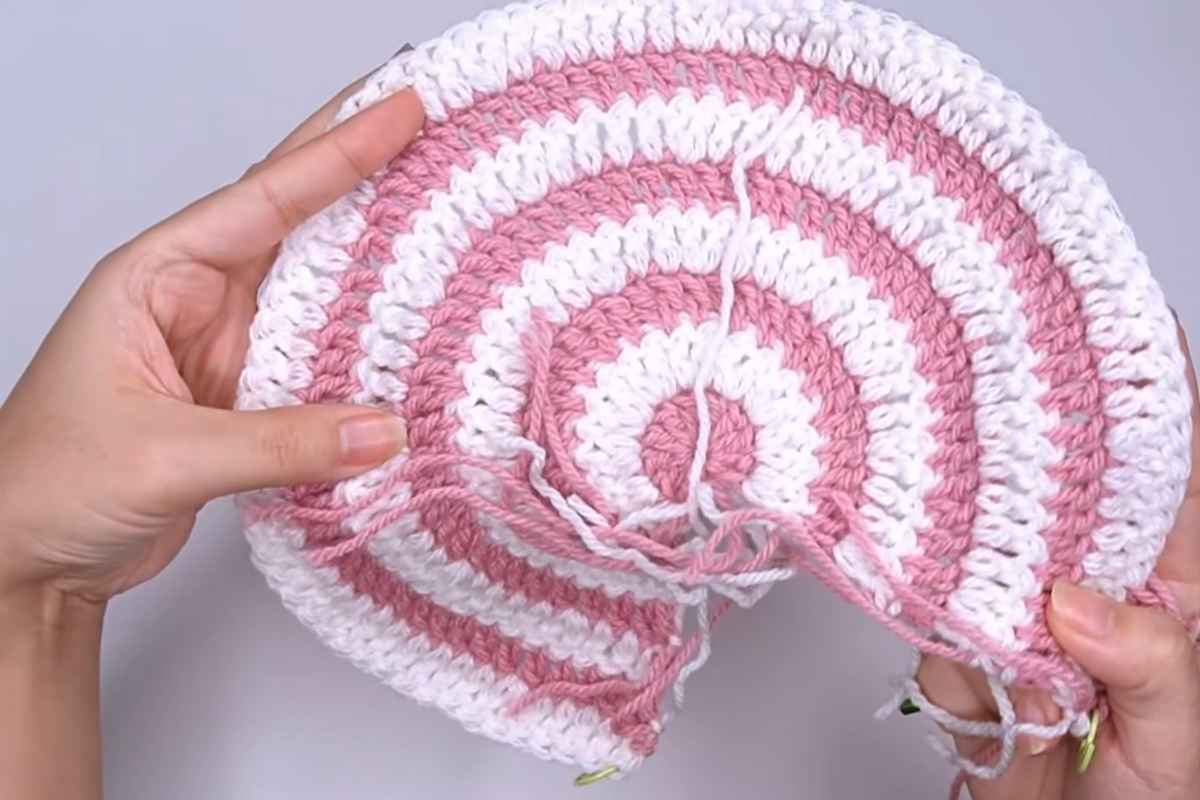
Constructing the Hat Base
Every great hat starts with a strong foundation. The base is worked in a simple circular shape before being extended downward to form the body.
- Start with a magic ring (or adjustable loop) to create a tight, neat crown.
- Work 8–12 single crochets into the ring and join to close.
- Increase evenly in each round by adding stitches at set intervals. This creates a flat disc that will form the top of the hat.
- Once the circle’s diameter matches the top measurement of your head, stop increasing.
Maintaining even tension during this stage is crucial for a smooth, professional finish.
Building the Body
After shaping the crown, continue crocheting without increases to form the straight sides of the hat. This section determines the overall depth and fit, so try it on occasionally to ensure comfort.
- For a snug fit, stop the body a bit shorter, as earflaps will add extra coverage.
- For a looser, more slouchy style, work additional rounds before starting the earflaps.
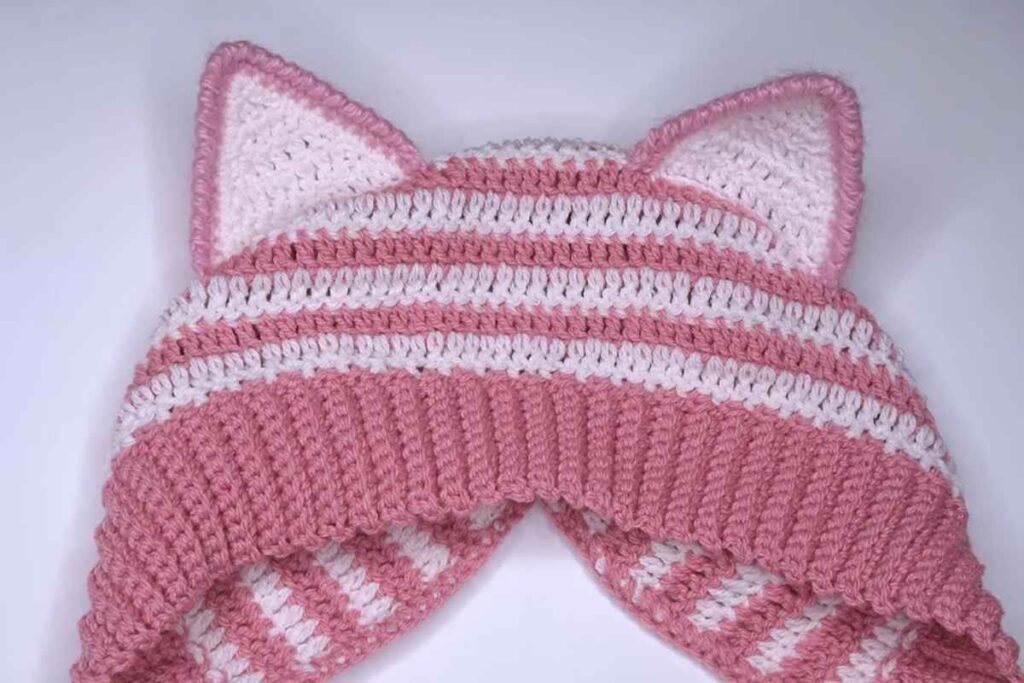
Creating the Earflaps
The earflaps are what make this style so practical in cold weather. They can be shaped in a variety of ways—rounded, triangular, or elongated.
- Position your hat so the seam is centered at the back.
- Mark two spots on the front sides where the earflaps will begin.
- Work in rows, decreasing slightly at the ends to form a gentle taper.
- Repeat for the opposite side, ensuring both flaps are symmetrical.
If desired, you can add braided ties or pom-poms to the ends of each flap for extra charm.
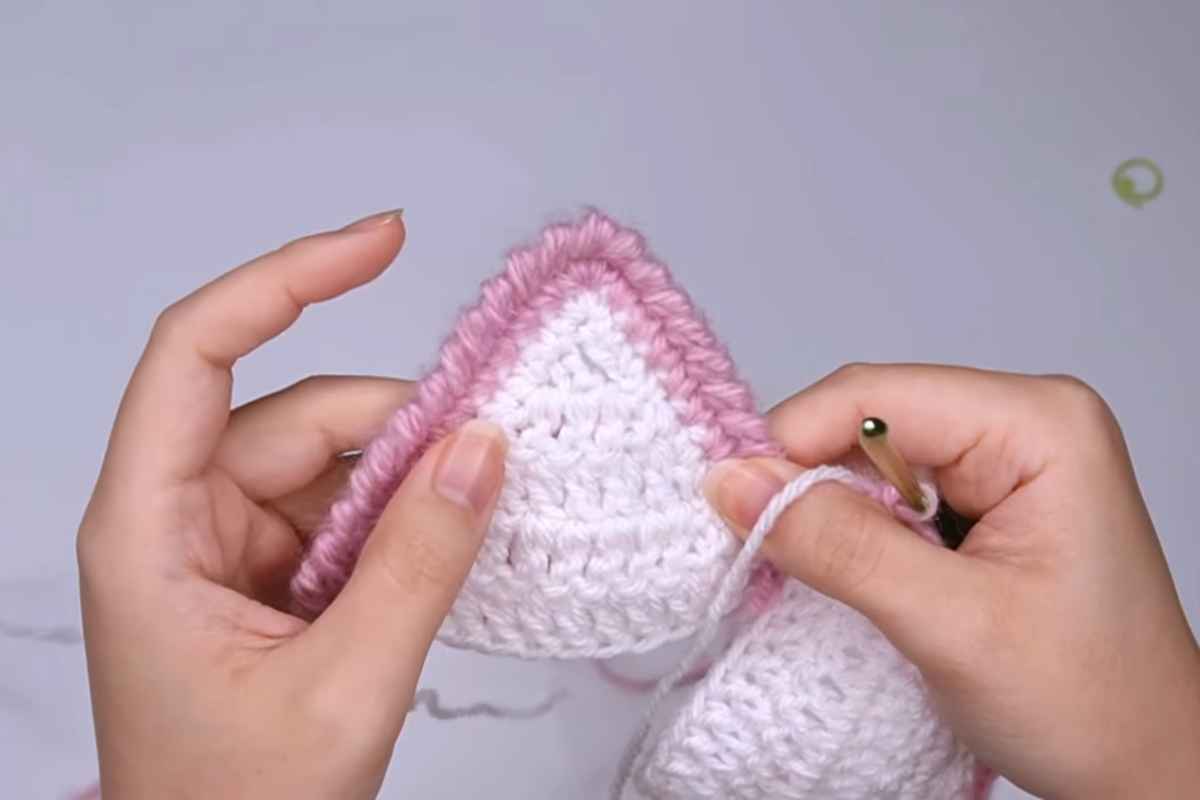
Making the Cat Ears
The real star of this project is the pair of triangular cat ears that sit neatly on top. They should be firm enough to hold their shape but still soft to the touch.
- Work small triangle pieces separately and sew them securely to the hat’s crown.
- Alternatively, you can crochet them directly onto the hat for a seamless look.
- Lightly stuffing them with a bit of yarn scrap can help them stand tall.
Ear placement matters—too far forward and they’ll look more like horns; too far back and they may droop. Aim for a natural balance above the temples.
Adding Personal Style
One of the best things about crochet is how easily you can customize your work:
- Colors: Go classic with solid black or gray for realistic cat ears, or try pastels and brights for a playful twist.
- Stripes or Patterns: Alternate yarn colors every few rows for a striped effect.
- Textured Stitches: Incorporate bobbles, puff stitches, or ribbing for added detail.
- Embellishments: Add a crochet bow, buttons, or even embroidery to give the hat personality.
Tips for Success
- Check your gauge before starting to avoid sizing issues.
- Keep your stitch count consistent to maintain symmetry between earflaps.
- Weave in ends securely, especially around the ears, so they stay in place with regular wear.
- If selling at a market, consider making a range of sizes to fit both kids and adults.

Caring for Your Hat
Handmade hats deserve proper care to maintain their shape and texture.
- Hand wash in cool water with mild detergent.
- Lay flat to dry, reshaping the ears as they dry.
- Avoid machine drying to prevent shrinkage or warping.
With the right care, your hat will last for many winters to come.
A Fun and Functional Project
A crochet cat earflap hat is more than just an accessory—it’s a statement piece. It’s a way to stay warm, express creativity, and bring a little joy to everyday winter outfits.
The combination of practical earflaps and whimsical cat ears makes it a versatile pattern suitable for all ages. Whether you keep it simple with neutral tones or go bold with bright colors, this project invites you to have fun while building crochet skills.
So, grab your yarn and hook, put on some cozy music, and start crafting a hat that will keep you smiling through the coldest days.
Images and patterns courtesy of Cherilyn Q
Enjoy The Video Tutorial

Source: Cherilyn Q
Did you find this post useful or inspiring? Save THIS PIN to your Crochet Board on Pinterest!

More crochet projects for you