
Mastering the TBL Rib Knit Stitch: A Step-by-Step Tutorial

Are you ready to elevate your knitting game and add a touch of sophistication to your projects? Look no further than the TBL Rib Knit Stitch Tutorial!
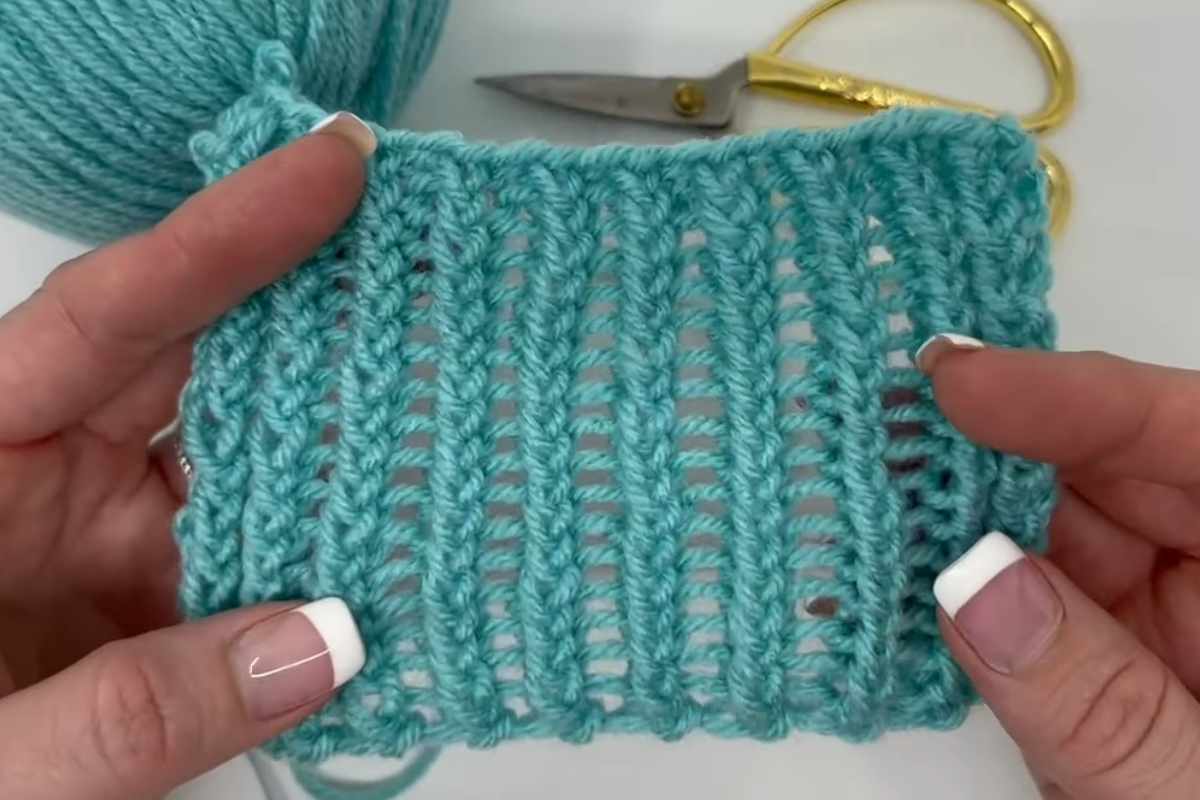
TBL, which stands for "through the back loop," takes the classic 1 x 1 knit rib and transforms it into a visually striking raised rib pattern that will impress everyone who sees it.
TBL Rib Knit Stitch Tutorial
In this step-by-step tutorial from Knit and Crochet Ever After, we'll dive into the world of TBL rib knitting and discover how this simple technique can make a big impact on your knitting projects.

Whether you're a beginner knitter or a seasoned pro, mastering the TBL rib knit stitch will open up a world of creative possibilities.
What is TBL Rib Knit Stitch?
The TBL rib knit stitch is a variation of the traditional knit rib stitch. By knitting through the back loop instead of the front loop, you create a unique raised texture that adds depth and dimension to your knitting.
This technique is perfect for adding visual interest to scarves, hats, sweaters, and more.
Why Choose TBL Rib Knit Stitch?
One of the key benefits of the TBL rib knit stitch is its versatility. Whether you're working on a cozy winter sweater or a lightweight summer shawl, this stitch pattern can be adapted to suit any project.
Plus, its raised texture makes it stand out from traditional ribbing, adding a touch of elegance to your finished pieces.
Getting Started: The Tutorial
In the video tutorial provided by Knit and Crochet Ever After, you'll learn everything you need to know to master the TBL rib knit stitch. From casting on to binding off, each step is clearly explained and demonstrated, making it easy for knitters of all skill levels to follow along.
Tips for Success
As you embark on your TBL rib knitting journey, keep these helpful tips in mind:
- Maintain Consistent Tension: Consistency is key when working with any knitting stitch, but it's especially important with TBL ribbing. Pay close attention to your tension to ensure uniformity across your project.
- Practice Makes Perfect: Like any new knitting technique, TBL ribbing may take some practice to master. Don't be discouraged if your first few attempts don't turn out perfectly. Keep practicing, and soon you'll be knitting TBL rib stitches with confidence.
- Experiment with Yarn and Needle Size: The beauty of TBL rib knitting is its versatility. Try experimenting with different yarn weights and needle sizes to create unique textures and patterns.
Unlock Your Knitting Potential
With the TBL Rib Knit Stitch Tutorial from Knit and Crochet Ever After, you have the power to take your knitting to the next level.
Whether you're looking to add texture to a simple scarf or elevate the design of a cozy sweater, the TBL rib knit stitch is sure to impress. So grab your needles, watch the tutorial, and unleash your creativity today!
Images and pattern courtesy of Knit and Crochet Ever After
Enjoy The Video Tutorial
Source: Knit and Crochet Ever After
Did you find this post useful or inspiring? Save THIS PIN to your Knitting Board on Pinterest! 😊

Once again, thank you for visiting our website!
We hope you've enjoyed exploring the content we've created for you.
Give yourself the chance to learn, get inspired, and have even more fun, keep browsing...
Last update on 2025-02-11 / Affiliate links / Images from Amazon Product Advertising API


You may also like