
Backyard Zipline Adventure: Safe and Fun for Kids

If you’re looking for an exciting way to transform your backyard into an adventure zone, a backyard zipline is the perfect solution. It’s a thrilling addition that provides hours of fun for kids while encouraging outdoor play and activity.
With proper planning and safety precautions, you can create a zipline experience that’s not only entertaining but also safe for everyone involved.
In this guide, we’ll walk you through everything you need to know about building a backyard zipline, from choosing the right equipment to ensuring safety measures are in place.
Why Build a Backyard Zipline?
A zipline is more than just a fun activity; it offers numerous benefits:
- Encourages Outdoor Play: It gets kids off screens and into the fresh air.
- Builds Confidence: Gliding on a zipline helps children overcome fears and try new things.
- Promotes Physical Activity: Climbing, holding on, and balancing provide great exercise.
- Memorable Fun: It turns your backyard into a destination for adventure.
Planning Your Backyard Zipline
Step 1: Assess Your Space
Before you start, evaluate your backyard to ensure it’s suitable for a zipline:
- Length: A zipline requires a clear, straight path with enough length for the ride (at least 50–100 feet for most kits).
- Anchoring Points: Identify two sturdy trees or posts to serve as anchor points. These should be at least 6 inches in diameter for trees or securely cemented for posts.
- Clearance: Make sure the area below the zipline is free from obstacles like rocks, bushes, or other hazards.
Step 2: Choose the Right Zipline Kit
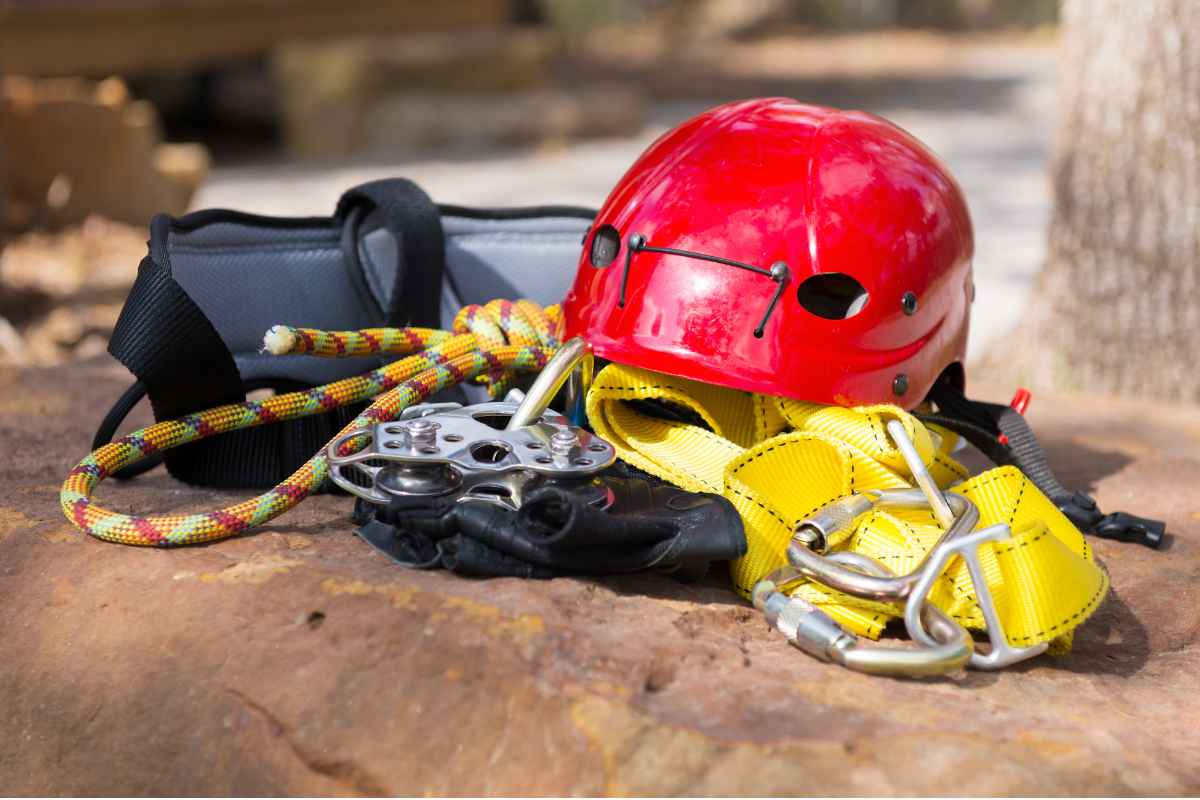
Zipline kits are readily available and come with everything you need for installation. Look for a kit that includes:
- Steel Cable: Durable and weather-resistant.
- Trolley: A smooth-gliding mechanism that holds the rider.
- Harness or Seat: Provides comfort and security during the ride.
- Safety Gear: Kits often include helmets and gloves for added protection.
How to Install Your Backyard Zipline
Step 1: Prepare the Anchors
- Attach the Cable: Wrap the steel cable securely around the starting anchor (tree or post). Use a turnbuckle to adjust tension and keep the cable taut.
- Secure the End Anchor: Repeat the process on the other end, ensuring the cable is tightly fastened and angled slightly downward for a smooth ride.
Step 2: Install the Trolley and Seat
- Attach the Trolley: Slide the trolley onto the zipline cable. This is the part that moves along the cable during the ride.
- Add the Seat or Harness: Connect the seat or harness to the trolley, following the manufacturer’s instructions.
Step 3: Test the Zipline
- Conduct a Safety Check: Before allowing kids to ride, test the zipline by applying weight to the trolley. Check for any loose components or slack in the cable.
- Adjust as Needed: Ensure the cable is secure and the zipline is positioned at an appropriate height (usually no more than 7–8 feet above the ground for kids).
Safety Tips for Your Backyard Zipline
1. Supervise at All Times
An adult should always be present to monitor zipline use. Supervision ensures kids follow safety rules and helps address any issues immediately.
2. Provide Safety Gear
- Helmet: Protects against head injuries.
- Gloves: Prevents friction burns from holding the trolley or cable.
- Harness or Seat: Keeps riders securely attached to the zipline.
3. Set Clear Rules
- Only one rider at a time.
- No standing or jumping off during the ride.
- Wait until the area is clear before starting.
4. Inspect Regularly
- Check the cable, trolley, and anchors for wear and tear.
- Tighten loose components and replace worn parts as needed.
- Clear any debris from the zipline path to prevent accidents.

Enhancing the Fun
Add Landing Pads
Place a soft landing pad or crash mat at the end of the zipline to ensure a gentle stop. This adds comfort and reduces the risk of injuries.
Incorporate Themed Decor
Make the zipline feel like a true adventure by adding decorations:
- Jungle Theme: Use vines or leafy decor around the zipline.
- Pirate Theme: Add a flag or treasure chest at the landing zone.
Create a Zipline Course
Expand the fun by adding complementary elements, such as:
- Climbing Wall: As a starting point for the zipline.
- Rope Bridge: Connects to the zipline for added adventure.
- Obstacle Course: Includes balance beams or tunnels leading up to the zipline.
Benefits of a Backyard Zipline
Physical Benefits
- Improves balance and coordination.
- Strengthens core and upper body muscles.
- Encourages active play, reducing sedentary behavior.
Social Benefits
- Fosters teamwork and sharing as kids take turns.
- Builds confidence and independence.
Entertainment Value
A zipline turns your backyard into a go-to spot for birthdays, playdates, and family gatherings.

Common Questions About Backyard Ziplines
Are Ziplines Safe for Kids?
Yes, when installed and used properly, ziplines are safe for kids. Always follow the manufacturer’s guidelines and implement safety measures like supervision, helmets, and harnesses.
What’s the Best Age for a Zipline?
Most zipline kits are designed for children aged 5 and up. Check the weight limit and other specifications on your chosen kit.
How Long Does Installation Take?
Installing a zipline typically takes 2–4 hours, depending on the complexity of your setup and the tools available.
Maintenance Tips for Longevity
- Weather Protection: Remove the trolley and seat during winter or periods of non-use to prevent rust or wear.
- Cable Care: Apply a protective coating to the steel cable if recommended by the manufacturer.
- Regular Inspections: Check all components every few weeks, especially during peak use.
A backyard zipline is an incredible addition that brings fun, excitement, and adventure to your outdoor space. With the right planning and a focus on safety, it’s a gift your kids will enjoy for years to come. Not only does it encourage outdoor play, but it also creates cherished memories of laughter and adventure.
So, gather your materials, choose the perfect spot, and start building your zipline adventure today. Your backyard is about to become the most thrilling place in the neighborhood!
Did you find this post useful or inspiring? Save THIS PIN for later in your Outdoor Board on Pinterest! 😊

Explore these outdoor tips too