3 Leafy Greens for Indoor Hydroponic Gardening

Indoor Hydroponic Gardening lets you harvest crisp greens without soil, bugs, or guesswork—even if you live in a small apartment with limited sun. Imagine stepping into your kitchen and snipping tender lettuce, frilly kale, or silky spinach straight into your bowl.
With a simple setup, you can be growing food indoors year-round, saving money and enjoying fresher flavors than most store produce. This guide focuses on three leafy winners—lettuce, kale, and spinach—because they’re fast, forgiving, and ideal for beginners.
You’ll learn the essentials of nutrient solution, light, airflow, and spacing so your greens stay sweet and vibrant rather than bitter or leggy. We’ll also show how to scale from a compact DIY hydroponics system on a countertop to a slim vertical unit that fits any apartment vegetable garden.
Why Indoor Hydroponic Gardening Works
Hydroponics feeds plants exactly what they need—water, oxygen, and mineral nutrients—without soil. That precision means faster growth, cleaner kitchens, and fewer pests. You control light and temperature, so weather doesn’t decide your dinner.
Whether you start with a homemade hydroponic system or a store-bought kit, the same fundamentals apply: keep roots moist and oxygenated, maintain gentle airflow above the canopy, and use a complete fertilizer balanced for greens.
For lights, aim for 14–16 hours daily with full-spectrum LEDs placed 15–30 cm above the leaves. Keep nutrient solution around EC 0.8–1.4 and pH 5.8–6.2; top up with plain water between changes to prevent salts from concentrating.
Lettuce: Fast, Tender, and Foolproof

Lettuce is the best “first success” in any Hydroponic Gardening For Beginners plan. Butterhead and loose-leaf types stay tender and don’t need heavy feeding. Sow 2–3 seeds per rockwool cube or seed plug.
Once the first true leaves appear, thin to the strongest seedling and move the plug into your raft, net pot, or channel when roots peek out.
Keep temperatures between 17–22°C to avoid bitterness or bolting. Good airflow prevents tip burn and ensures even transpiration under bright lights.
Brief how-to: Start seeds in cubes pre-soaked at pH ~5.8. Place cubes in a raft (Kratky style) or a recirculating unit. Maintain a shallow air gap so roots get oxygen; if using a reservoir, an air stone helps. Begin with a mild nutrient (EC ~0.8–1.0). Harvest baby leaves in 18–25 days or full heads around 30–40 days. For perpetual salads, stagger seeds weekly so new plants replace harvested ones.
Flavor & troubleshooting: Pale leaves signal low nitrogen or light; raise EC slightly or lower the light distance. Bitter leaves often mean heat stress or too many hours under light—reduce to 14 hours and keep temps near the low 20s. If tips brown, add airflow and check calcium levels in your nutrient mix.
Learn tips for planting this vegetable here
Kale: Nutrient-Dense Leaves With Big Yields

Kale thrives in hydroponics thanks to steady moisture and reliable nutrients. Curly and Lacinato (dinosaur) kale do well indoors and can be pruned for months.
Because kale grows larger than lettuce, give each plant a wider berth—about 20–25 cm—to let frills expand. Keep EC a bit higher (1.0–1.4) and maintain strong but not scorching light to build sturdy, flavorful leaves.
Brief how-to: Germinate as you would lettuce. Transplant once roots show, then support the stem if it leans. Remove older outer leaves first to encourage continuous production.
Kale tolerates a slightly cooler room (16–20°C) and appreciates periodic nutrient changes (every 10–14 days) to avoid salt buildup. If leaves yellow from the bottom, check magnesium and iron; a cal-mag supplement can steady growth.
Flavor & troubleshooting: If kale tastes tough, reduce light intensity a notch and harvest younger leaves. Leggy growth usually means the light is too far away—close the gap to 15–20 cm. Curled, dry edges often indicate low humidity; add gentle airflow plus a humidity range near 45–55%.
Learn tips for planting this vegetable here
Spinach: Cool-Loving and Silky

Spinach prefers cooler temperatures and steady moisture, which makes a controlled indoor setup perfect. Because spinach can be finicky in warm rooms, keep it near 16–20°C and avoid blasting it with heat from lights. Choose quick baby-leaf varieties for consistent results and abundant harvests.
Brief how-to: Pre-soak seeds for a few hours to speed germination. Start in pH-balanced cubes and move to the system at the first true leaves.
Keep the nutrient mild (EC 0.8–1.2) and lights on the gentler side. Harvest by snipping outer leaves every few days, allowing the center to regrow. If plants try to bolt, reduce temperature and daytime light hours to 12–14.
Flavor & troubleshooting: Metallic or bitter flavors point to heat or excess EC; add water to dilute and improve airflow. If leaves are small and dark, lower the EC slightly and check that roots aren’t waterlogged—ensure an air gap or run a bubbler so they stay oxygenated.
Learn tips for planting this vegetable here
Starter Setups That Fit Any Space
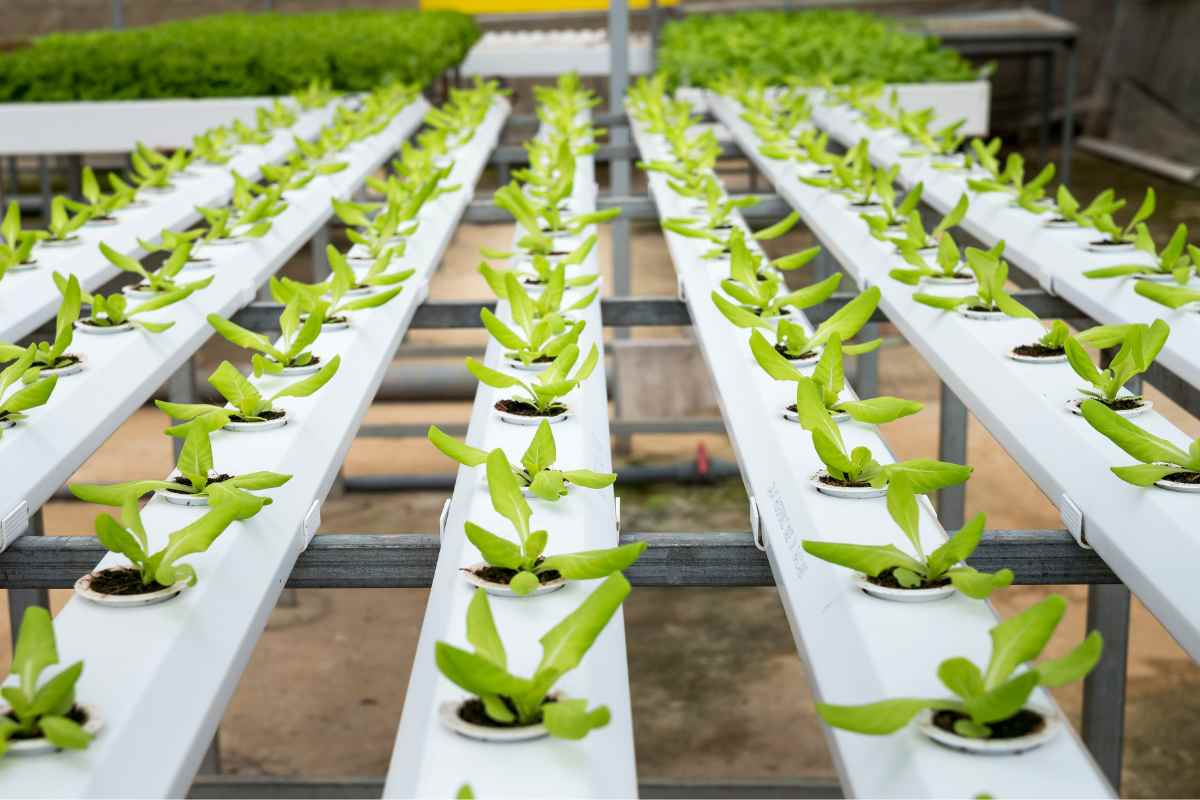
If you’re growing food indoors for the first time, begin with a simple raft (Kratky) bin or a small recirculating unit. A DIY hydroponics system can be as basic as a food-safe tote, net pots, nutrient solution, and an air pump.
For tight spaces, a DIY hydroponic tower turns vertical walls into salad factories; just ensure each level gets even light.
As your confidence grows, step up to a compact hydroponic greenhouse in a sunroom or balcony enclosure to buffer temperature swings while keeping the convenience of indoor access.
Looking to scale yields? Explore hydroponic farming methods like nutrient film technique (NFT) or deep water culture (DWC) with larger reservoirs for temperature stability.
If you’re experimenting with fish and plants together, small indoor aquaponics kits can supply leafy greens while teaching nutrient cycling—just keep stocking densities low and test water regularly.
No matter the path, keep cables tidy, label nutrients, and track pH/EC in a log for predictable harvests.
Plant Spacing, Light, and Nutrition
Use dense spacing for baby greens (8–10 cm) and wider spacing for head lettuce or big kale (20–25 cm). Place lights so leaves are bright but not bleached; if edges crisp, raise the fixture or add a diffuser.
For nutrition, choose a complete hydroponic formula for leafy greens; it emphasizes nitrogen, calcium, and micronutrients without overloading potassium.
Refresh the reservoir every 1–2 weeks, more often in warm rooms. Always top up with plain water to keep EC stable between changes.
Airflow and cleanliness are non-negotiable. A small fan prevents stagnant pockets and strengthens stems. Wipe splash zones, rinse tools, and keep reservoirs opaque to block algae.
If you plan a bigger indoor food garden with multiple shelves, run power through GFCI outlets and secure cords away from water. These habits protect plants—and you.
From Countertop to Apartment Vegetable Garden
One beauty of hydroponics is modular growth. Start with a single bin for lettuce, add a second for spinach, then dedicate a deeper reservoir to kale.
Stack shelves or go vertical with a DIY hydroponic tower to transform a spare corner into a productive apartment vegetable garden.
If you later move to a balcony enclosure or sunroom, your core skills transfer seamlessly to a compact hydroponic greenhouse with better light and airflow.
As your harvests expand, you’ll know when it’s time to scale: reservoirs empty faster, leaves crowd, and you crave variety.
That’s when NFT channels or a small DWC rack shine. Keep the workflow simple—seed on Sunday, transplant midweek, harvest on weekends—and label batches by date so you enjoy a continuous, stress-free rotation.
Quick Comparison: Lettuce vs. Kale vs. Spinach

Lettuce grows fastest and tastes mild—perfect for daily salads and sandwiches. It’s the best on-ramp for anyone exploring Hydroponic Gardening For Beginners.
Kale yields for months and adds body to sautés and smoothies. Spinach loves cooler conditions and shines in quick stir-fries or fresh bowls. Mix all three for texture and nutrition, and you’ll never get bored.
Regardless of your setup—Kratky tote, recirculating channels, or tower—the fundamentals don’t change. Keep roots oxygenated, light consistent, and nutrients balanced.
Document what you tweak so your system becomes a reliable, personalized playbook for Indoor Hydroponic Gardening.
Keep Learning and Growing
Ready to turn today’s ideas into a steady stream of homegrown greens? Build a small homemade hydroponic system, test a couple of varieties, and track your results.
As you refine your process, you’ll naturally graduate from Hydroponic Gardening For Beginners to a confident indoor grower. Want to expand beyond leafy greens?
Try herbs next, or experiment with strawberries once temperatures are stable. With practice, your home can function like a compact, efficient indoor food garden that surprises guests and delights your taste buds.
Explore More Hydroponic Ideas
If this guide inspired you, browse our other articles on lighting, nutrients, and space-saving systems—from DIY hydroponics system builds to beginner-friendly indoor aquaponics concepts and modular racks that scale toward small-format hydroponic farming. We cover practical upgrades, safety basics, and troubleshooting so your greens stay lush all year long.
More Gardening Tips 👇🏼👇🏼